
Hello there! For comprehensive details, access the manual here…..
- When a #KOMATSU excavator exhibits slow or weak performance, inspecting the unloading valve #sany When a #KOMATSU excavator exhibits slow or weak performance, inspecting the unloading valve is essential.
- Threshold hour setting in L&T Komatsu hydraulic excavator Hydraulic excavators are used for heavy duty construction & mining operations. Threshold hour is set to overcome maintenance …
I’m Manie the mechanic, and today we’re diving deep into the intricate world of shift interlock repair on a Komatsu PC400LC-8 hydraulic excavator. Now, this machine is a marvel of engineering, and its shift interlock system is crucial for ensuring safe operation. Let’s break this down step by step, discussing every tool and procedure involved in the repair process.
### Understanding the Shift Interlock System
Before we get our hands dirty, let’s understand the purpose of the shift interlock system. This system is designed to prevent the operator from shifting the machine’s transmission out of the neutral position unless certain conditions are met, such as the brake being applied. This is a safety feature that helps prevent accidental movement, which is vital for the safety of the operator and those nearby.
### Tools Required
1. **Socket Set**: A comprehensive socket set is essential for loosening and tightening bolts. You’ll want a ratchet and a variety of sockets—typically metric sizes like 10mm, 12mm, and 14mm, since Komatsu often uses metric fasteners.
2. **Wrenches**: A set of combination wrenches will come in handy for areas where a socket won’t fit. These are useful for tight spaces around the interlock mechanism.
3. **Screwdrivers**: A flathead and Phillips screwdriver will be necessary for removing any screws that may be securing covers or panels.
4. **Pliers**: Needle-nose pliers can assist with removing clips or small components that may be difficult to grasp with fingers.
5. **Torque Wrench**: After repairs, you’ll want to ensure that all components are tightened to the manufacturer’s specifications. A torque wrench allows you to apply the correct amount of force to fasteners.
6. **Multimeter**: To check for electrical issues, a multimeter can be invaluable. This device will help diagnose whether the interlock system is receiving the necessary signals.
7. **Flashlight**: A good LED flashlight will help illuminate dark areas within the excavator’s chassis, making it easier to see what you’re working on.
8. **Safety Gear**: Don’t forget your gloves, safety glasses, and steel-toed boots. Safety is paramount in any mechanical work.
### Step-by-Step Repair Process
#### Step 1: Safety First
Before we start any repair, make sure the machine is on a level surface and the engine is turned off. Engage the parking brake and remove the key from the ignition. It’s crucial to prevent any accidental movement during the repair process.
#### Step 2: Access the Shift Interlock Mechanism
1. **Remove the Operator’s Console**: Use your socket set to remove the bolts securing the operator’s console. There may be several screws or bolts that need to be taken out, so keep track of them in a labeled container.
2. **Disconnect Wiring Harness**: Carefully unplug any wiring harnesses connected to the console. Use your pliers to gently pinch any clips that may be holding the connectors in place.
3. **Locate the Shift Interlock Mechanism**: Once the console is removed, you should see the shift interlock mechanism. This is usually located near the transmission and is connected to the gear lever.
#### Step 3: Inspect the Mechanism
Examine the shift interlock assembly for any visible damage or wear. Look for broken springs, worn-out components, or any debris that may be obstructing movement.
#### Step 4: Disassemble the Interlock Assembly
1. **Remove Fasteners**: using your socket set, remove the bolts or screws that secure the interlock assembly. Pay attention to the order of disassembly, as you’ll need to reverse this process later.
2. **Carefully Take Apart the Assembly**: Gently separate the components of the interlock assembly. Be mindful of any small springs or pins that may fly out during disassembly.
#### Step 5: Repair or Replace Components
1. **Inspect Each Part**: Check for signs of wear, rust, or damage. If you find any components that are broken or excessively worn, it’s best to replace them with genuine Komatsu parts for reliability.
2. **Lubricate Moving Parts**: If parts are in good condition, apply a small amount of grease to moving components to ensure smooth operation.
#### Step 6: Reassemble the Shift Interlock Mechanism
1. **Reattach Components**: Carefully put the interlock assembly back together in the reverse order of disassembly. Ensure that all springs are seated correctly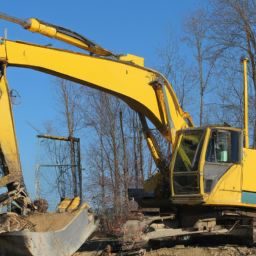 and that there are no loose parts.
2. **Secure with Fasteners**: Use your torque wrench to tighten the fasteners to the manufacturer’s specifications. This ensures everything is secure and functioning properly.
#### Step 7: Reconnect Wiring Harness and Console
1. **Reconnect Electrical Connections**: Plug in any wiring harnesses you previously disconnected, ensuring that connections are secure and correctly oriented.
2. **Reattach the Operator’s Console**: Position the console back in place and secure it with the bolts you removed earlier. Double-check that everything aligns properly.
#### Step 8: Test the Shift Interlock System
1. **Reconnect the Battery**: If you had disconnected the battery for safety, reconnect it now.
2. **Start the Machine**: With the key in the ignition, start the excavator and test the shift interlock system. Ensure that you can only shift out of neutral when the brake is applied.
3. **Check for Error Codes**: using your multimeter, check for any electrical issues by testing the relevant circuits in the interlock system.
### Conclusion
Congratulations! You’ve successfully repaired the shift interlock system on a Komatsu PC400LC-8 hydraulic excavator. Remember, proper maintenance and timely repairs are essential for the longevity and safety of heavy machinery. Always refer to the manufacturer’s service manual for specific details and torque specifications, as these can vary by model.
Keep your tools organized, work safely, and happy excavating!
The seat frame is a critical structural component of a vehicle’s seating system, serving as the foundational support for the seat assembly. Typically made from materials such as steel, aluminum, or high-strength plastics, the seat frame is designed to provide durability and stability while accommodating various seating positions and comfort features. Its primary function is to support the weight of the occupant and maintain the integrity of the seat structure during normal driving conditions, including acceleration, braking, and cornering.
The seat frame is engineered to withstand significant forces, ensuring that it remains robust over time. It is often designed with specific contours and shapes to enhance ergonomics, providing support to the lumbar region and aligning with the natural curvature of the human body. This design consideration is essential for promoting driver and passenger comfort, especially during long journeys.
Moreover, the seat frame is integral to the incorporation of safety features, such as side airbags and seatbelt anchors. In many modern vehicles, the frame is also equipped with mechanisms for adjustments, allowing users to modify the height, tilt, and recline of the seat, thereby enhancing the overall driving experience. The design and construction of the seat frame are crucial Not only for comfort and adjustability but also for ensuring occupant safety and compliance with regulatory standards in automotive manufacturing.